Calling Tooling API From Apex
First, why would you need this?
Why would you ever need to use Salesforce’s Tooling API? If you are unsure, Salesforce has a pretty good description on how it can help.
Use Tooling API to build custom development tools or apps for Lightning Platform applications. Tooling API’s SOQL capabilities for many metadata types allow you to retrieve smaller pieces of metadata. Smaller retrieves improve performance, which makes Tooling API a better fit for developing interactive applications.Tooling API provides SOAP and REST interfaces. — “Introducing Tooling API” — Official Documentation
The hyperlink explains examples and is a good starting point if you have more curiosity. It’s not often, hopefully, that you need to do something and you just can’t do it with Salesforce’s language Apex, but there are times where you just can’t. In our case, we needed to get all of the Metadata from our Org, and the only options we had was the Tooling API and the Metadata API, we chose the Tooling API.
At first I was having trouble and even thought you couldn’t call the Tooling API from Apex, but then I stumbled upon Andrew Fawcett’s repository and was like AWESOME!
After digging around, I realized that this was like using a bazooka to solve my problem and I learned so much from this repository being public, so thank you Andrew Fawcett!
Now Let’s Wire it Up!
Below are the steps you can use to get the Tooling API wired up and have it working in your Org within 15 minutes.
Step 1: Creating a Connected App
To begin, we need a Connected App so that we can generate a Client Id and Secret used for the next step. In Setup, navigate to Platform Tools -> Apps -> App Manager if you are in lightning. If you are in classic, navigate to Create -> Apps
Click the “New Connected App” at the top right corner if you are in lightning. If you are in classic, click the “New” button in the Connected Apps related list.
When making the Connected App, make sure the following are filled out:
Name: [NAME]
Developer Name: [DEVELOPER_NAME]
Callback URL: [PLACEHOLDER]
Selected OAuth Scopes: Full access, Perform requests on your behalf at any time
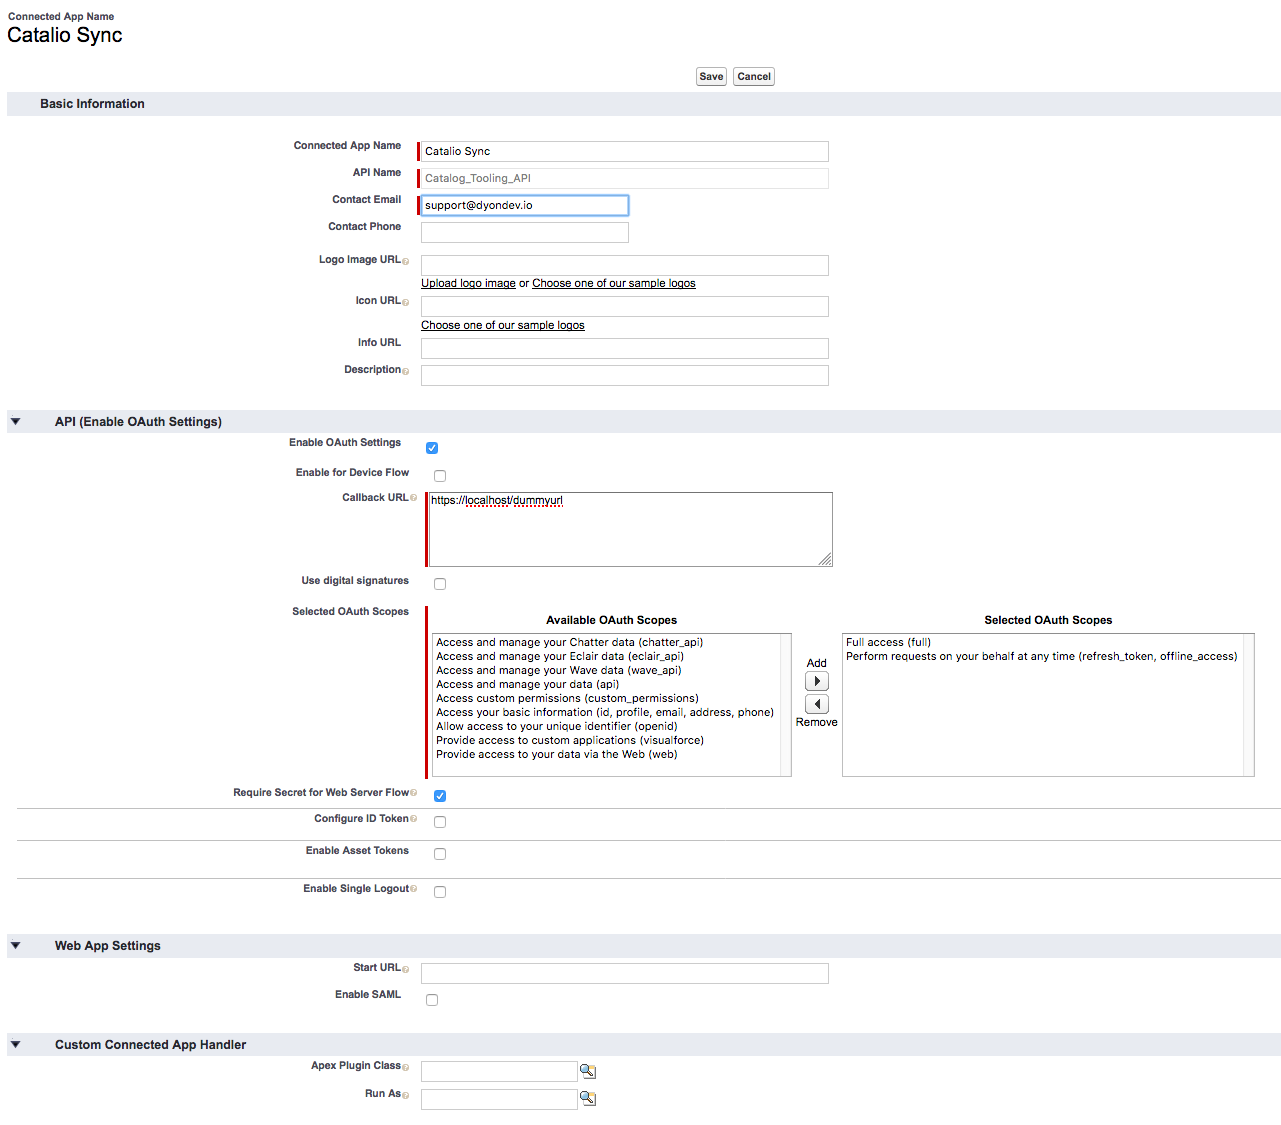
If you are trying to connect to the same Org, we will come back and update the Callback URL after setting up the Auth Provider in the next step, but if you are using this to connect to a different Org, then you can fill in the URL now if you have it. (Will be from the Auth. Provider that was created in the other Org)
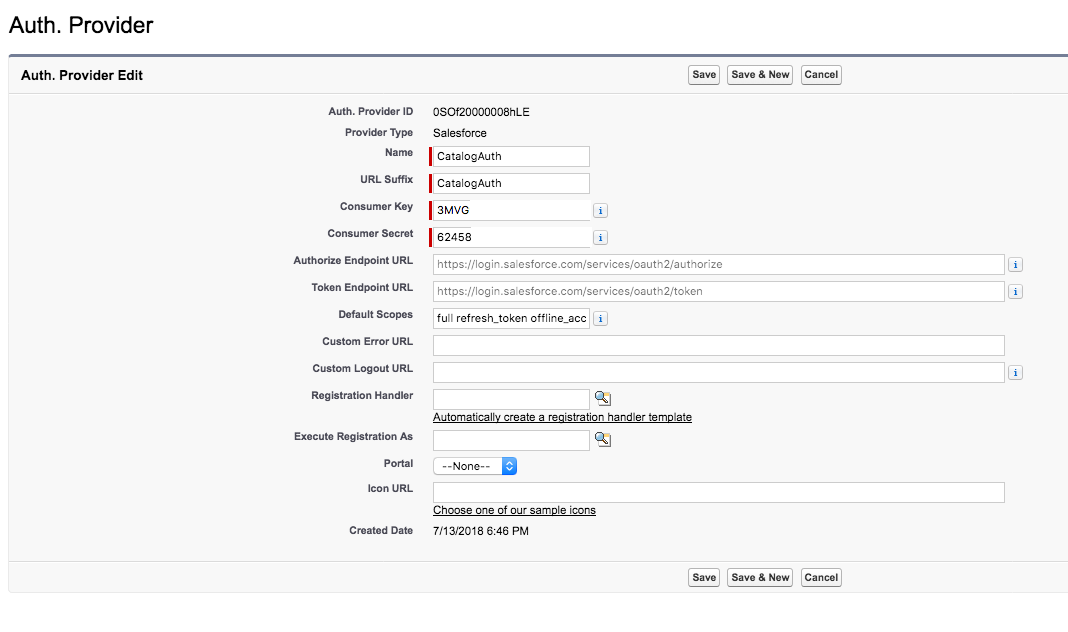
Step 2: Creating an Auth. Provider
The authentication provider is utilized to facilitate the authentication with your Salesforce org.
In Setup, navigate to Settings -> Identity -> Auth. Providers if you are in lightning. If in classic, navigate to Security Controls -> Auth. Providers and click the “New” button in the related list.
When making the Auth. Provider, make sure the following fields are filled out:
Name: [NAME]
URL Suffix: [URLSUFFIX]
Consumer Key: [Paste in the Consumer Key]
Consumer Secret: [Paste in the Consumer Secret]
Default Scopes: full refresh_token offline_access
Leave all other fields blank as shown in the screenshot below and save.
Step 3: Update Connected App Callback URL
The Callback URL has now been generated and is located under the Salesforce Configuration section. Copy the Callback URL and edit the Connected App we created earlier in Step 1, and paste in the Callback URL under the OAuth section.
Save the Connected App. Salesforce should warn you about waiting a few minutes to allow the settings to take effect and propagate throughout Salesforce’s infrastructure.
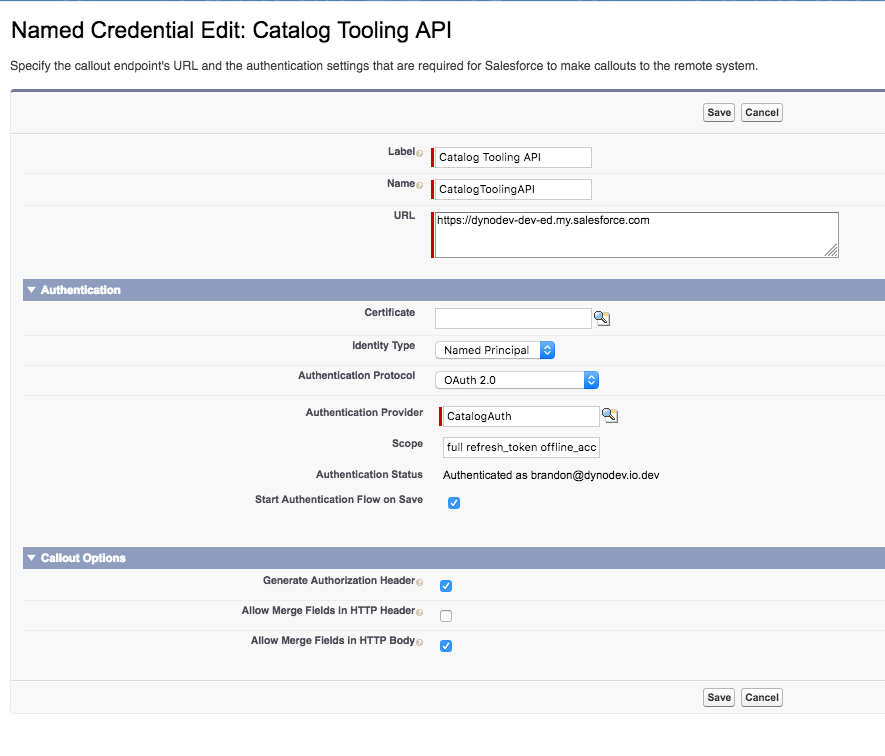
Step 4: Creating a Named Credential
Next we can setup our Named Credential.
In Setup, navigate to Settings -> Security -> Named Credentials if you are in lightning. If in classic, navigate to Security Controls -> Named Credentials and click the “New” button in the related list.
When making the Named Credential, make sure the following fields are filled out:
Label: [LABEL]
Name: [NAME]
URL: Enter your org’s instance URL — this will be the URL for your instance (e.g. na1.salesforce.com), or if you are using My Domain, your fully qualified My Domain domain (e.g. mycompany.my.salesforce.com)
Identity Type: Named Principal
Authentication Protocol: Ouath 2.0
Authentication Provider: [Choose the Auth. Provider created in Step 2]
Scope: full refresh_token offline_access
Generate Authorization Header: Unchecked
Allow Merge Fields in HTTP Header: Unchecked
Allow Merge Fields in HTTP Body: Checked
You will be prompted to log in to your org. After you log in, you will see the connected app authorization screen. Click “Allow”.
Allow access to this app. Once complete, you should be redirected back to the Named Credential screen and see that the status is now set to “Authenticated as….”
You can now use the Named Credential to query the Tooling API, REST API, or Metadata API securely with ease! Don’t forget to follow us for more tips and tricks about Salesforce Development, or head over to our Catalio help center to learn more about Catalio and how it can help make your life easier when it comes to managing your Salesforce instance.